Interested in creating Resin Epoxy Art that is unique to you and your artistic expression? We invite you on a journey through the magical realm of Resin, where we discuss Epoxy Resin DIY Prep, Tips, & ideas.
It can be easy to jump right in when we begin a new creative path. Resin Art comes with its own set of unique challenges, which may require some patience, organization, courageous creativity, and perhaps a bit of research. There is a lot to learn, and at times, working with resin can feel overwhelming. We’re hoping this article may help to support you in the first steps and guide you in creating Resin Art that is beautiful, practical, and unique in design.
If you are like us when we first started, you may be wondering "Which supplies do I need?", "Where do I order supplies from? "What do I need to set up a safe and efficient workspace?"
We sat down to discuss some of the unique crafts which inspired our passion for Resin Art and we made a list of the essential Epoxy Resin Tips & Techniques which helped us along our journey.
Your safety is a top priority.
WHAT SAFETY PROCEDURES DO WE FOLLOW WHEN WORKING WITH RESIN?
Safety is a SUPER important. Remember, epoxy resin is a chemical. Even though many are marketed as being "non-toxic," we must take proper precautions to ensure our health and satefy.
Beginners will need the basics:
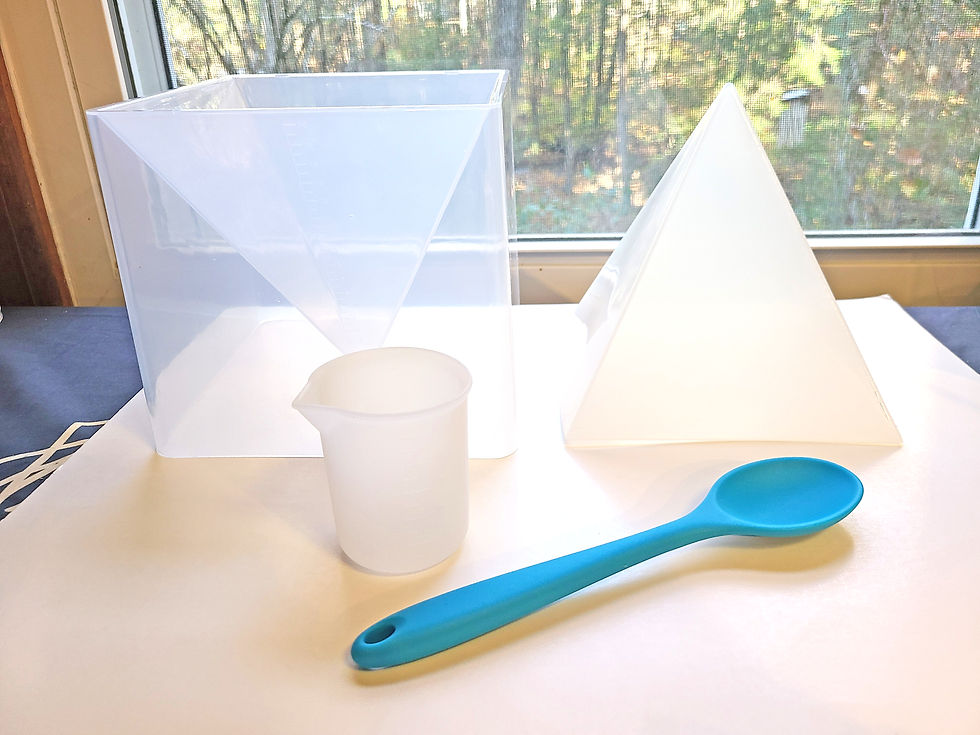
Mixing Cup, Mixing Spoon, Placemat (We recommend using all Silicone materials for easiest clean up)
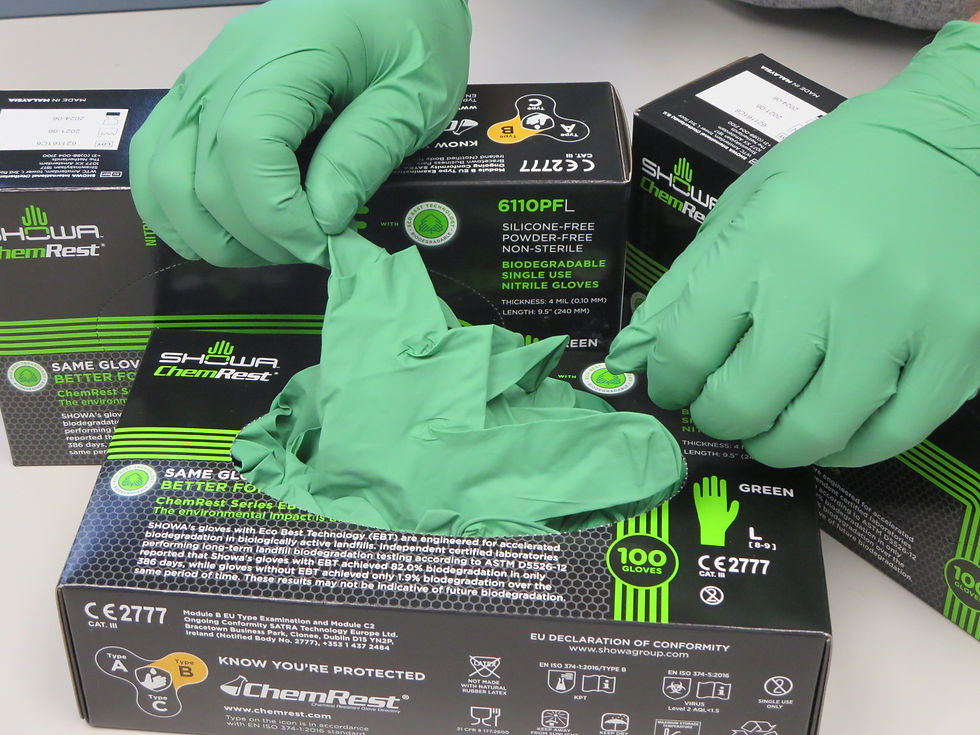
Nitrile gloves – needed to protect your hands and nitrile gloves are least likely to react with your skin.
A well-ventilated space – opening a window is an easy way to keep your space ventilated.
Goggles – I’d recommend them for pouring and sanding. You don’t want epoxy splashing in your eyes.
A good 3M mask or respirator (other brands are available). When sanding cured epoxy and working with large volumes of epoxy, you must wear one.
Next is the workspace. This is a fun hobby for most people after all, many of which were inspired during lockdown. But if you are working from home, we always advise that no children or pets have any exposure to potential epoxy fumes. To help avoid this, we recommend thoroughly cleaning your surfaces and clothes after use and keeping your workspace out of communal areas as much as possible.
If you can use a different sink from the family kitchen to wash out equipment, then this is advised.
Just make sure you do your research and work responsibly no matter your setup. Crafting is a lot more fun when you know you’re keeping yourself and others around you safe.
HOW DO YOU PREPARE YOUR WORK AREA BEFORE YOU START ON A PROJECT?
We have a general setup that stays in place for when we're ready to work in the room, but we clean up and re-set up regularly as needed.
Here are the things we find noteworthy:
We have silicone mats, mixing cups & spoons that are a godsend - using silicone materials cuts down a huge amount of plastic waste and cleaning time.
Often, Resin can be simply cracked/scraped off the silicone utensils once it is dry, however Rubbing Alcohol is also amazing for when you need to clean the hardened resin from your silicone materials.
We keep our Silicone molds stacked flat in the cabinet as this ensures their longevity.
We organize art supplies not only because it is nicer to look at, but also to help make it easy to find items and additions while working with fast-curing epoxy.
The heat gun and lighter stay off at all times when not in use, stored away from everything else.
A clear, open, room-temp, and level work space for measuring and mixing
One ‘couldn’t do without’ are these trays with lids that I put my smaller molds in and then use this as transport to the drying racks - this makes for an easy swap with each new crafting session.
WHAT KEY SUPPLIES DO BEGINNERS NEED BEFORE THEY START THEIR VERY FIRST PROJECT?
Personal Protective Equipment (Gloves, Mask, Goggles)
Resin & hardener
Heat gun (or small gentle flame with a long handle if working very small items)
Any bedazzlements you prefer: crystals, powders, inks, flowers, etc
Silicone Materials: Molds, Silicone Measuring Cup, & Silicone Spoon
Plastic Sheet/Silicone Mat to protect your work surface
Consider something that covers your creations during curing


WHERE DO YOU PURCHASE YOUR SUPPLIES?
Resin and Hardener: ArtnGlow - Art N Glow is made right here in US with USDA Non-Toxic Food Grade compounds, dries crystal clear, is UV-resistant (resists yellowing from the sun), contains No VOCs (volatile organic compounds), and gives off little to No Odor. It is sold in a variety of different quantities and price points to accommodate for the many unique forms of epoxy art.
If you would like to purchase Art N Glow, you're welcome to use the code ARTFAM for 20% off for a limited time through the OpaLight Referral Link!
Simply copy and paste the code ARTFAM during checkout at:
EcoPoxy Eco-friendly, sustainable & bio-based resin products. They offer a comprehensive lineup of safe products, detailed and accurate information, as well as helpful tips and tricks.
EntropyResins Entropy Resins takes pride in creating sustainable epoxies that lower their impact on the environment without compromising performance. Through green chemistry, sustainable raw materials, and efficient manufacturing they conserve energy, minimize harmful byproducts and reduce greenhouse gas emissions of their resins and hardeners.
Molds:
OmOfferings.com
OpaLightMarket.etsy.com
eBay, Etsy, Wish, Amazon, & Aliexpress. Aliexpress is undoubtedly best on price yet shipping from China can take a long time, so we like to reccomend eBay as a happy medium. I’d say the most unique molds are on Etsy.
Independent mold makers on Etsy/social media. You can also join mold maker groups on Facebook.
WHAT ARE GOOD STARTER MOLDS FOR A BEGINNER?
A variety is always best. Obviously, it depends on what you are keen on trying, but if you want to learn all round skills to really control, perfect and manipulate your materials, I’d recommend:
Teeny Tiny Molds: We love working with these Bookmark Molds and Antique Key Molds. We thought they were both very fun and easy to work with.
Casting Molds: Something like a Crystal Heart Mold is great for making gifts for Loved ones, a Lotus Coaster Mold is great for working with a detailed pattern on a thinner layer.
Pyramids : These will help you master layers, patience, eradicating bubbles and how to see the bigger picture of a project. If you’re a total beginner, we recommend starting with the smaller pyramid molds first.


If you have the goal of selling your creations, ask yourself, what is going to be popular within your personal interests?
WHAT MISTAKES DID YOU MAKE AT THE BEGINNING OF YOUR RESIN ART JOURNEY THAT YOU HAVE LEARNED FROM?
Not mixing thoroughly enough and for a long enough time. I now mix for ages, and then I’ll go back and mix some more!
Not measuring precisely enough. We all get over excited at the beginning, but take your time to get it right first time.
Not working on level areas
Taking things out of the molds too soon. Patience is Key. Even after you think things are hard to the touch and therefore cured, its never a bad idea to allow for a little extra curing time.
CAN YOU GIVE US YOUR TOP 5 TIPS TO WORKING WITH EPOXY?
Research. The resin art journey is often trial and error by nature and often the best way to really learn is to get a feel for it and have the courage to actually make a few of those mistakes. But there are thousands of videos and tutorials on YouTube to help save yourself time and money. We recommend watching everything you can – and this may also help you get inspired and excited along the way.
Patience. Patience is a beautiful skill one can master through this type of art.
Really know your materials, especially your epoxy resin and hardener. For example, how long to leave your epoxy to thicken up enough to create the best patterns or to perfectly suspend your inks. The main question beginners ask is “why is my glitter sinking?” It’s the difference between chunky glitter sinking to the bottom or fine glitter rising to the top. Once you know your curing times, you’ll learn when the best time is to do certain techniques.
Whether you are doing it for a fun hobby or to start a small business, be unique to yourself. What do YOU like?
Similarly, connect with all your fellow creatives, show your support and share the love. I have resin buddies on Instagram that I’ve never met but we share each other’s work, share tips and suppliers. We inspire each other. “Mix for ages,” says Kate. “Then mix some more.”
WHAT IS YOUR BEST TIP FOR AVOIDING BUBBLES IN YOUR RESIN CREATIONS?
Bubbles – the other big question and not just for beginners.
Initially we use the heat gun to lightly and carefully heat the epoxy to encourage the bubbles to rise to the top and pop (careful not to scorch by going too close and always keep the heat moving). In smaller items, a small lighter with a long handle can be used. You can also try making a hot water bath, and placing the mixing cup with mixed resin inside until bubbles float to the surface. For larger projects, some people use pressure pots to squeeze the bubbles to a size that can’t be seen, but this is not necessary until you are at that level.
When we work with ArtnGlow Resins, we stir as smoothly as we can, not taking my silicone spoon or spatula out of the epoxy (those tempting motorized mixers, they can actually create more bubbles, so you don’t need one) then we leave the mixed epoxy throughout the process and the bubbles rise themselves. So we stir and leave, stir and leave – and add a little heat here and there through methods mentioned above.
In molds with depth, you will get bubbles. My tips here are to pour down the side as smoothly as you can. I often apply a little heat around the molds at a distance and tip molds where I can to let bubbles come out. Toothpicks are also handy for the odd stubborn, hard-to-reach bubble.
As with everything resin related it’s a trial and error and getting a feel for it.
We wish you Great Joy & Much Success with your Resin Art creations!
Jillian & Jaime
OpaLight Market
Comments